Two-Host XenServer Pool With Manual Fail-Over
By eric | Published November 3, 2019 | Updated March 13, 2020
A guide on how to install and operate a two-host XenServer pool with manual fail-over. This is the first part of a series of articles on a small-footprint XenServer setup with no single points of failure.
When would you consider a two-host XenServer pool? In most cases, a high-access (HA) setup with three or more hosts would be preferable, because that gives you automatic fail-over. However, the two-host solution might be your choice if;
- You need redundancy, but HA is overkill. If you have time to switch over manually, HA may be unnecessary.
- Budget restrictions mean a 3-host (or more) solution is undoable.
- You simply can't find a third host (or more) that will work with the two hosts you already have. Sounds odd? Wait until you see the XenServer requirements for hardware in a pool...
- A 2-host solution is a bit simpler to maintain than an HA solution.
Contents
Installation and Configuration
General Considerations
“A resource pool comprises multiple XenServer host installations, bound together into a single managed entity that can host Virtual Machines. When combined with shared storage, a resource pool enables VMs to be started on any XenServer host which has sufficient memory and then dynamically moved between XenServer hosts while running with minimal downtime (XenMotion). If an individual XenServer host suffers a hardware failure, then the administrator can restart the failed VMs on another XenServer host in the same resource pool.” [3]
Note that only if high availability (HA) is enabled on the resource pool, will VMs be automatically moved if their host fails.
Prerequisites
Manual fail-over requires a minimum of 2 XenServer hosts – only the master switched on – with a XenServer storage repository (SR) readily available:
SR (storage repository: A XenServer storage repository (SR) is a storage container on which virtual disks are stored. Both storage repositories and virtual disks are persistent, on-disk objects that exist independently of XenServer. SRs can be shared between servers in a resource pool and can exist on different types of physical storage devices, both internal and external, including local disk devices and shared network storage. [1]
SSH: Establish SSH with certificates to the SR host in the system. Increase security by disabling password login and base everything on client and server certificates. See [5] for details (Ubuntu server reference installation).
A properly configured firewall: The firewall protecting the subnet must be configured so that VPN and SSH are workable. Moreover, to the degree that firewalls are enabled on each host, these must also allow for necessary services, including SSH. For example, see [6] for details on the Ubuntu UFW Firewall.
A XenServer joining a pool;
- is not a member of an existing resource pool,
- has no shared storage configured,
- has no running or suspended VMs,
- has no active operations on the VMs in progress, such as one shutting down,
- its management interface is not bonded,
- its management IP address is static,
- is running the same version of XenServer software, at the same patch level, as servers already in the pool, see Preparing VMs for Use in a Pool below for details, and
- the clock of the host joining the pool is synchronized to the same time as the pool master.
Host hardware requirements: The CPUs on the server joining the pool are the same (in terms of vendor, model, and features) as the CPUs on servers already in the pool (with some variation possible, see [3]). The details on each CPU relevant for XenServer can be checked in the CLI of each XenServer.
It is possible to create pools with slightly different hosts. Whether a so-called heterogeneous setup actually works has to be thoroughly tested. If you can, use the most homogenous setup possible.
Installation and Configuration
So how do we get started? Let's start by using this hardware setup:
- 2 x Asus VivoMini PCs with Intel i5, 4Gb RAM and 128Gb SSD as XenServer hosts
- HP Pentium 4 with a 250Gb HHD
- A gigabit ethernet controller
It is possible to run XenServer on very limited hardware setups. Running a pool with mini-PCs like Intel NUCs or Asus VivoMinis is a real possibility, and not only for the lab, but for real-world applications. Note that if you chose to go with hardware setups that are not included in the XenServer list of approved hardware, those setups need to be tested.
Create XenServer Pool
Step 1 - Check Prerequisites
In order to access the XenServer hosts that we are going to use to use for the pool, we need to
- access each host through XenCenter,
- access each host through SSH using the console,
- use both XenCenter and SSH access, or
- work with xsconsole, the local terminal directly on the server.
In the following, I will show both XenCenter and SSH access. I will mention xsconsole whenever it is the fastest route to solve something.
Note that there are some things that are easier and faster to do via the command-line interface (CLI), while others are better done via XenCenter. The CLI is especially useful if you are dealing with lots of hosts and/or lots of VMs.
Connecting to the XenServer hosts via SSH: To get started, open the terminal and log into the first XenServer host (in this case samplehost01):
		$ ssh This email address is being protected from spambots. You need JavaScript enabled to view it.
		The authenticity of host '10.0.0.43 (10.0.0.43)' can't be established.
		ECDSA key fingerprint is...
		Are you sure you want to continue connecting (yes/no)? yes
		Warning: Permanently added '10.0.0.43' (ECDSA) to the list of known hosts.
		This email address is being protected from spambots. You need JavaScript enabled to view it.'s password:
		[root@samplehost01 ~]#
Listing 1: Logging into XenServer CLI (Command Line Interface) with SSH (samplehost01).
Open a new window in the terminal and log into it (in this case samplehost02):
		$ ssh This email address is being protected from spambots. You need JavaScript enabled to view it.
		The authenticity of host '10.0.0.53 (10.0.0.53)' can't be established.
		ECDSA key fingerprint is...
		Are you sure you want to continue connecting (yes/no)? yes
		Warning: Permanently added '10.0.0.53' (ECDSA) to the list of known hosts.
		This email address is being protected from spambots. You need JavaScript enabled to view it.'s password:
		[root@samplehost02 ~]#
Listing 2: Logging into XenServer CLI (Command Line Interface) with SSH (samplehost01).
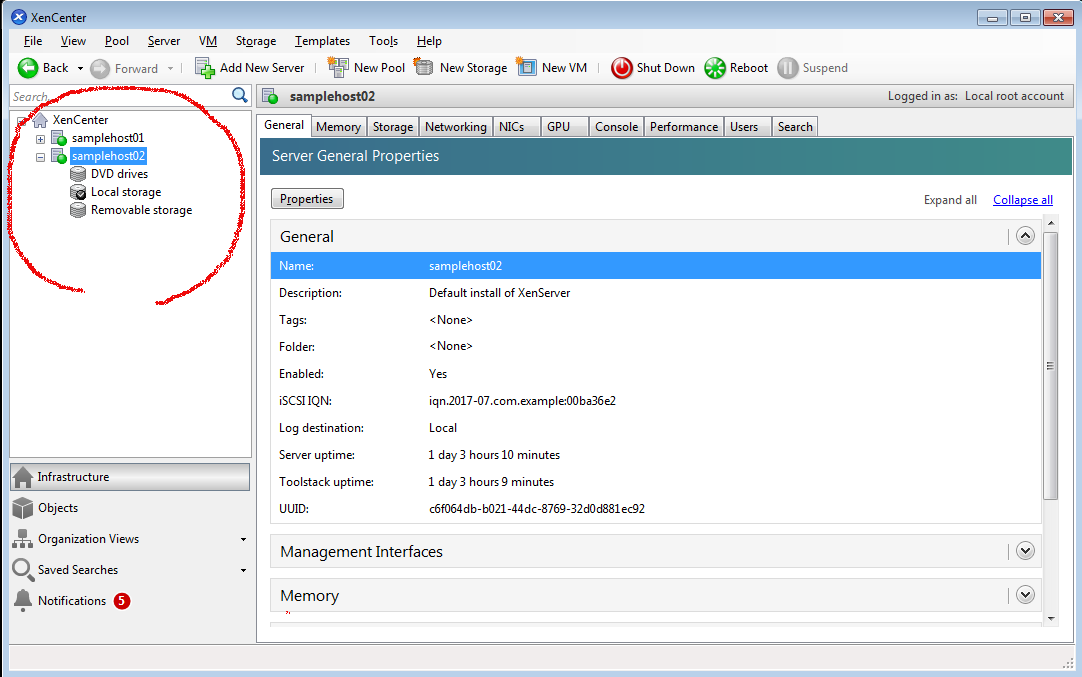
In Xencenter: Start XenCenter and connect to your hosts using Server - Add. After filling out server-IP and credentials, the hosts should become visible in the left frame.
Figure 1: XenServer hosts in XenCenter.
A. Is the hardware of the hosts similar?
We can use xe host-cpu-info to figure out if the CPUs are similar. For samplehost01 we get:
	[root@samplehost01 ~]# xe host-cpu-info
	cpu_count       : 1
	    socket_count: 1
	          vendor: GenuineIntel
	           speed: 1039.990
	       modelname: Intel(R) Celeron(R) CPU  N3000  @ 1.04GHz
	          family: 6
	           model: 76
	        stepping: 3
	           flags: fpu de tsc msr pae mce cx8 apic sep mca cmov pat clflush acpi mmx fxsr sse sse2 ht syscall nx lm constant_tsc arch_perfmon rep_good nopl nonstop_tsc pni pclmulqdq monitor est ssse3 cx16 sse4_1 sse4_2 movbe popcnt aes rdrand hypervisor lahf_lm 3dnowprefetch ida arat epb dtherm erms
	        features: 43d8e3bf-bfebfbff-00000101-28100800
	     features_pv: 17c9cbf5-c2f82203-2191cbf5-00000103-00000000-00000200-00000000-00000000-00000000
	    features_hvm: 17cbfbff-c3f82223-2993fbff-00000103-00000000-00000282-00000000-00000000-00000000
Listing 3: Getting host CPU information with xe host-cu-info (samplehost01).
For samplehost02 we get:
	[root@samplehost02 ~]# xe host-cpu-info
	cpu_count       : 1
	    socket_count: 1
	          vendor: GenuineIntel
	           speed: 1039.990
	       modelname: Intel(R) Celeron(R) CPU  N3000  @ 1.04GHz
	          family: 6
	           model: 76
	        stepping: 3
	           flags: fpu de tsc msr pae mce cx8 apic sep mca cmov pat clflush acpi mmx fxsr sse sse2 ht syscall nx lm constant_tsc arch_perfmon rep_good nopl nonstop_tsc pni pclmulqdq monitor est ssse3 cx16 sse4_1 sse4_2 movbe popcnt aes rdrand hypervisor lahf_lm 3dnowprefetch ida arat epb dtherm erms
	        features: 43d8e3bf-bfebfbff-00000101-28100800
	     features_pv: 17c9cbf5-c2f82203-2191cbf5-00000103-00000000-00000200-00000000-00000000-00000000
	    features_hvm: 17cbfbff-c3f82223-2993fbff-00000103-00000000-00000282-00000000-00000000-00000000
Listing 4: Getting host CPU information with xe host-cu-info (samplehost02).
Not only are these CPUs similar; they are also identical! Can we proceed? Not yet; we also need to check networking, available memory, and storage. Have a look at networking with lspci | egrep -i --color 'network|ethernet', available memory and memory type with free -m and dmidecode -t 17, and storage hardware with lsblk -o KNAME,TYPE,SIZE,MODEL. On our sample-hosts we get:
		[root@samplehost01 ~]# lspci | egrep -i --color 'network|ethernet'
		02:00.0 Ethernet controller: Realtek Semiconductor Co., Ltd. RTL8111/8168/8411 PCI Express Gigabit Ethernet Controller (rev 15)

		[root@samplehost01 ~]# free -m
	              total        used        free      shared  buff/cache   available
		Mem:            595         234          59           0         301         322
		Swap:          1023           0        1023

		[root@samplehost01 ~]# dmidecode -t 17
		# dmidecode 2.12-dmifs
		SMBIOS 2.8 present.

		Handle 0x0015, DMI type 17, 40 bytes
		Memory Device
			Array Handle: 0x0013
			Error Information Handle: Not Provided
			Total Width: 64 bits
			Data Width: 64 bits
			Size: 4096 MB
			Form Factor: DIMM
			Set: None
			Locator: DIMM_A1
			Bank Locator: A1_BANK0
			Type: DDR3
			Type Detail: Unknown
			Speed: 1600 MHz
			Manufacturer: Kingston
			Serial Number: 0A04224A
			Asset Tag: A1_AssetTagNum0
			Part Number: 99U5469-045.A00LF
			Rank: 1
			Configured Clock Speed: 1600 MHz
			Minimum Voltage:  1.35 V
			Maximum Voltage:  1.5 V
			Configured Voltage:  1.35 V

		Handle 0x0017, DMI type 17, 40 bytes
		Memory Device
			Array Handle: 0x0013
			Error Information Handle: Not Provided
			Total Width: Unknown
			Data Width: 64 bits
			Size: No Module Installed
			Form Factor: DIMM
			Set: None
			Locator: DIMM_B1
			Bank Locator: B1_BANK1
			Type: Unknown
			Type Detail: Unknown
			Speed: Unknown
			Manufacturer: A1_Manufacturer1
			Serial Number: A1_SerNum1
			Asset Tag: A1_AssetTagNum1
			Part Number: Array1_PartNumber1
			Rank: Unknown
			Configured Clock Speed: Unknown
			Minimum Voltage:  Unknown
			Maximum Voltage:  Unknown
			Configured Voltage:  Unknown

		[root@samplehost01 ~]# lsblk -o KNAME,TYPE,SIZE,MODEL
		KNAME TYPE   SIZE MODEL
		sda   disk 111,8G WDC WDS120G1G0B-
		sda1  part    18G
		sda2  part    18G
		sda3  part  70,3G
		dm-0  lvm      4M
		sda4  part   512M
		sda5  part     4G
		sda6  part     1G
		loop0 loop  55,1M
Listing 5: Information on networking, available memory, and storage (samplehost01).
If we use the same commands on samplehost02, we get exactly the same results. What luck! We are not only dealing with siblings here; we are dealing with identical twins! Let's see whether our luck holds. On to the next hurdle.
XenCenter: Look at CPU and memory under the General-tab, disk(s) under the Storage-tab, and network card(s) under the NICs-tab, and compare.
B. Are the hosts members of an existing resource pool?
Pools and members of pools can be seen in XenCenter. If you connect to a server via its IP-address, XenCenter will show any eventual pool of which the server is a member. Alternatively, you can use xe pool-list in the CLI to get a list of pools, if any. As we can see from the figure above, showing the CLI, there are no pools present. We can also check by using xe pool-list in the CLI:
		[root@samplehost01 ~]# xe pool-list
		uuid ( RO)                : b3012c9d-1f16-1cf0-e5c0-d32781b0635b
		          name-label ( RW):
		    name-description ( RW):
		              master ( RO): 2b92ba08-26a4-43bb-979f-919cab5dad02
		          default-SR ( RW):
Listing 6: Pool membership check with xe pool-list (samplehost01).
		[root@samplehost02 ~]# xe pool-list
		uuid ( RO)                : db6b3614-75ca-0790-d095-52b0e6c225f5
		          name-label ( RW):
		    name-description ( RW):
		              master ( RO): c6f064db-b021-44dc-8769-32d0d881ec92
		          default-SR ( RW): 1fe2de86-33cc-d171-958e-3e6091ca05e5
Listing 7: Pool membership check with xe pool-list (samplehost02).
Looks like both hosts are members of an existing pool! But hold on; when a host is not a member of any resource pool, it is a master of its own pool. This pool has no name (nothing in the "name-label ( RW)"-entry) and the UUID of the master is the same as the host. Compare the UUIDs below with the UUID of the masters above:
		[root@samplehost01 ~]# xe host-list
		uuid ( RO)                : 2b92ba08-26a4-43bb-979f-919cab5dad02
		          name-label ( RW): samplehost01
		    name-description ( RW): Default install
Listing 8: Getting UUID with xe host-list (samplehost01).
		[root@samplehost02 ~]# xe host-list
		uuid ( RO)                : c6f064db-b021-44dc-8769-32d0d881ec92
		          name-label ( RW): samplehost02
		    name-description ( RW): Default install
Listing 9: Getting UUID with xe host-list (samplehost02).
In other words, the hosts are not members of any existing resource pool, and this can also be seen in the XenCenter, where no pool is shown. Moreover, if a host is a member of a pool, and there are more members of a pool, all members are shown when using xe host-list. We can proceed to the next hurdle.
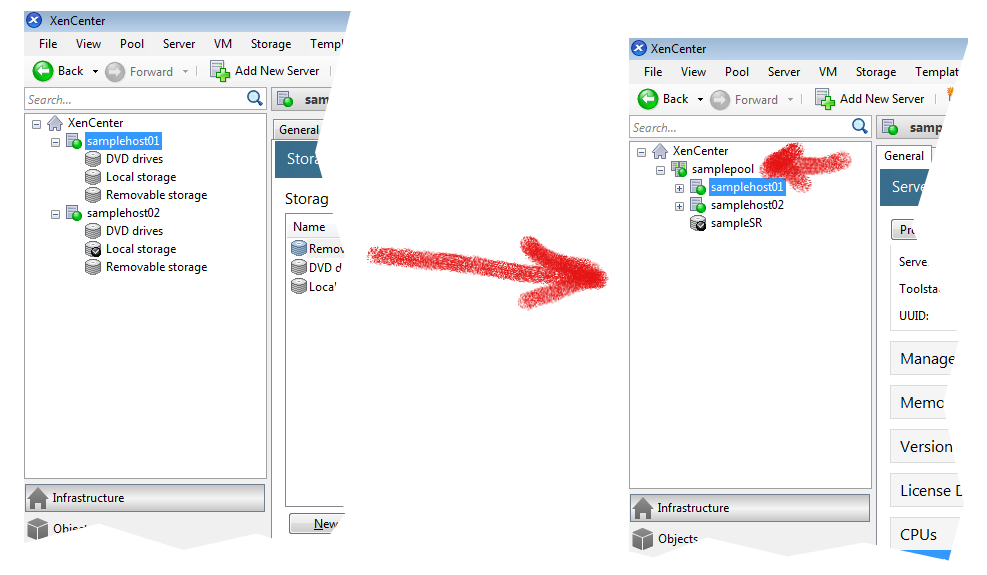
Figure 2: XenCenter - host being a member of a pool.
C. Do any of the hosts have shared storage?
Let's have a look at the storage repositories on each host, using the xe sr-list command:
		[root@samplehost01 ~]# xe sr-list
		uuid ( RO)                : a1948f97-74c6-5853-636d-011ed328701d
		          name-label ( RW): DVD drives
		    name-description ( RW): Physical DVD drives
		                host ( RO): samplehost01
		                type ( RO): udev
		        content-type ( RO): iso


		uuid ( RO)                : eebf776b-25a4-95e6-8f09-6c3d4617db63
		          name-label ( RW): Removable storage
		    name-description ( RW):
		                host ( RO): samplehost01
		                type ( RO): udev
		        content-type ( RO): disk


		uuid ( RO)                : 35f93cb9-0a8f-193d-d762-db4246af3a85
		          name-label ( RW): Local storage
		    name-description ( RW):
		                host ( RO): samplehost01
		                type ( RO): lvm
		        content-type ( RO): user


		uuid ( RO)                : 90099b2e-3112-15da-77bc-89b16631d531
		          name-label ( RW): XenServer Tools
		    name-description ( RW): XenServer Tools ISOs
		                host ( RO): samplehost01
		                type ( RO): iso
		        content-type ( RO): iso
Listing 10: Looking at storage repositories with xe sr-list (samplehost01).
		[root@samplehost02 ~]# xe sr-list
		uuid ( RO)                : eac2732f-3ff6-4782-f823-3b4d4deba342
		          name-label ( RW): XenServer Tools
		    name-description ( RW): XenServer Tools ISOs
		                host ( RO): samplehost02
		                type ( RO): iso
		        content-type ( RO): iso


		uuid ( RO)                : 1fe2de86-33cc-d171-958e-3e6091ca05e5
		          name-label ( RW): Local storage
		    name-description ( RW):
		                host ( RO): samplehost02
		                type ( RO): lvm
		        content-type ( RO): user


		uuid ( RO)                : adf2e119-6cd7-1b4e-f192-4492043420b9
		          name-label ( RW): DVD drives
		    name-description ( RW): Physical DVD drives
		                host ( RO): samplehost02
		                type ( RO): udev
		        content-type ( RO): iso


		uuid ( RO)                : 373c6177-2bfb-d75c-c774-2664a971000f
		          name-label ( RW): Removable storage
		    name-description ( RW):
		                host ( RO): samplehost02
		                type ( RO): udev
		        content-type ( RO): disk
Listing 11: Looking at storage repositories with xe sr-list (samplehost02).
Lots of information, but it is all about local storage. No shared storage in sight. Everything in order. Next!
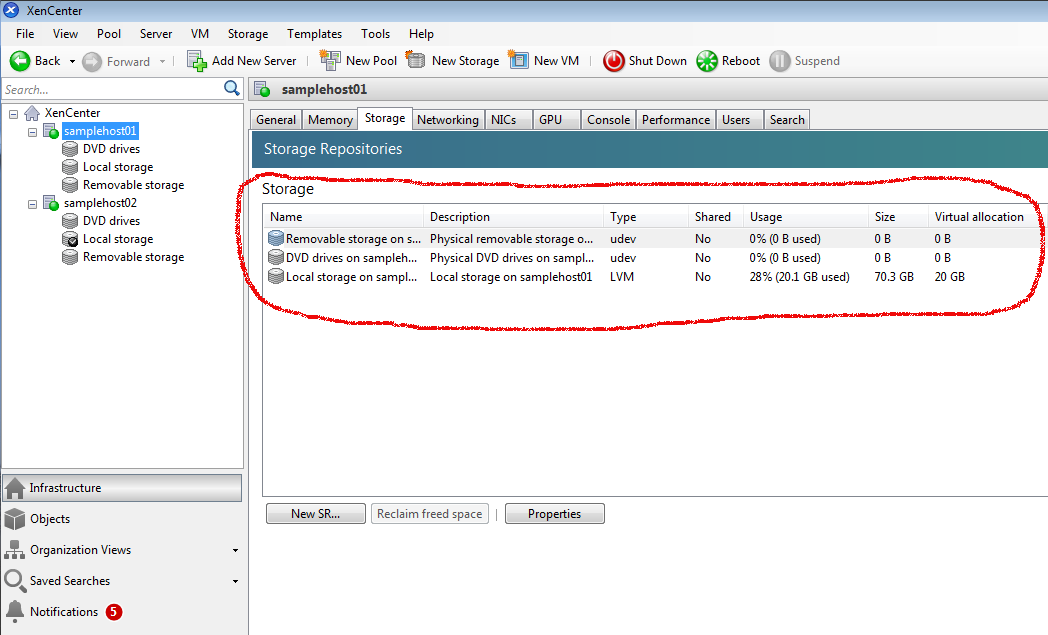
XenCenter: Eventual shared storage can also be seen in XenCenter, under the storage-tab:
Figure 3: XenCenter - storage overview.
D. Are there any running or suspended VMs on any of the hosts?
To figure out which VMs are on the hosts, and which state each VM is in, we use xe vm-list. Entering it in the samplehost02 CLI, we get:
		[root@samplehost02 ~]# xe vm-list
		uuid ( RO)           : b4a9d8ab-82a7-4dce-9626-7c85628f3e9c
		     name-label ( RW): Control domain on host: samplehost02
		    power-state ( RO): running
Listing 12: Looking at virtual machines with xe vm-list (samplehost01).
This host has only the control domain running. There are no VMs. However, if we run xe vm-list on samplehost01, we get a different result:
		[root@samplehost01 ~]# xe vm-list
		uuid ( RO)           : b6f69169-ca93-4596-9c1b-cc0191da98f4
		     name-label ( RW): Control domain on host: samplehost01
		    power-state ( RO): running


		uuid ( RO)           : f4654234-d92f-5556-cb8f-e0bd0b3701b3
		     name-label ( RW): Turnkey Github
		    power-state ( RO): halted


		uuid ( RO)           : 6fdd403e-fa18-91d9-4730-9e2ca8a4f064
		     name-label ( RW): Turnkey OpenVPN
		    power-state ( RO): halted
Listing 13: Looking at virtual machines with xe vm-list (samplehost02).
This host has the control domain running, In addition, there are two VMs, but they are neither running nor suspended, so we are OK. Next!
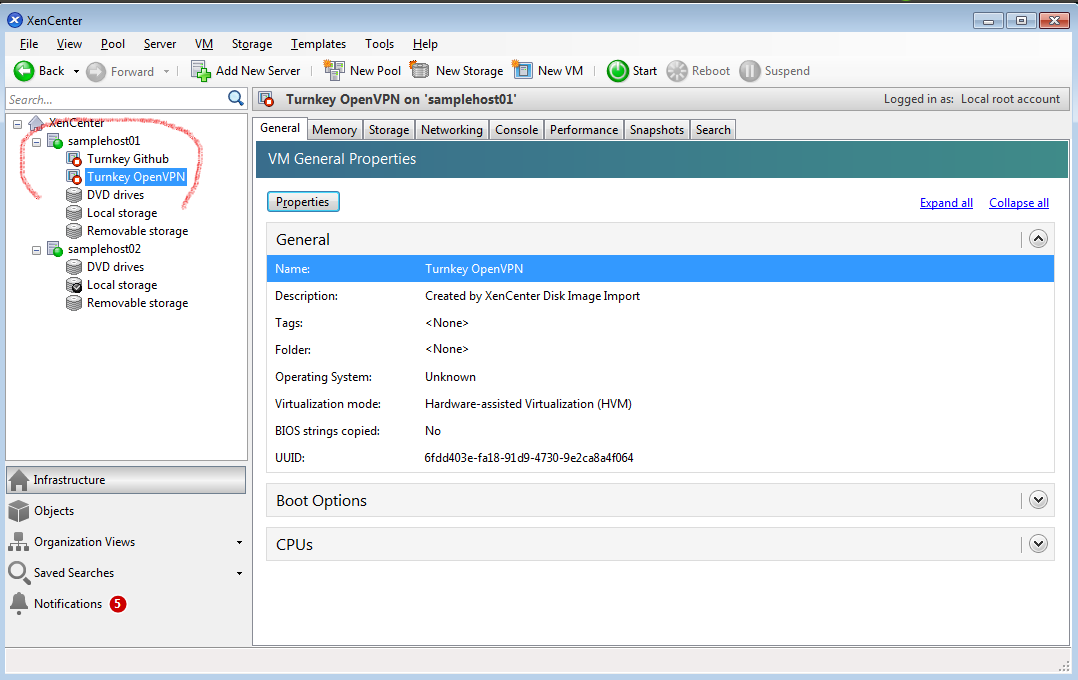
XenCenter: You can clearly see running or suspended VMs in the top left panel (expand each host to see all VMs). In this case, the VMs are clearly halted.
Figure 4: XenCenter - Expanded hosts with VMs visible.
E. Are there active operations on the VMs in progress on any of the hosts?
On one host we have no VMs, and on the other, all VMs are halted so that nothing could be going on, right? Wrong. One or several of the VMs might be in the process of being moved, copied, or exported, or a snapshot of the VM may be in progress. To check if any process is active, use the list_domains-command:
		[root@samplehost01 ~]# list_domains
		id |                                 uuid |  state
		 0 | b6f69169-ca93-4596-9c1b-cc0191da98f4 |     R
		 1 | fa7db159-3c45-bc5a-1e16-d546eef4c63f |    B
Listing 14: Active domains and their state with list_domains (samplehost01).
		[root@samplehost02 ~]# list_domains
		id |                                 uuid |  state
		 0 | b4a9d8ab-82a7-4dce-9626-7c85628f3e9c |     R
Listing 15: Active domains and their state with list_domains (samplehost01).
On samplehost02, only the control domain is running (The uuid listed is the control domain as seen in D above.). On samplehost01, something is going on, and we have to wait until the process has terminated - or stop the process - before we move on. If you have trouble terminating a process, see Troubleshooting below.
As an alternative to list_domains, we can use xentop. The advantage of this command is that it gives us a console window that is continuously updated with the current processes on the host, in this case dom0 and two VMs:
Figure 5: xentop on XenServer host.
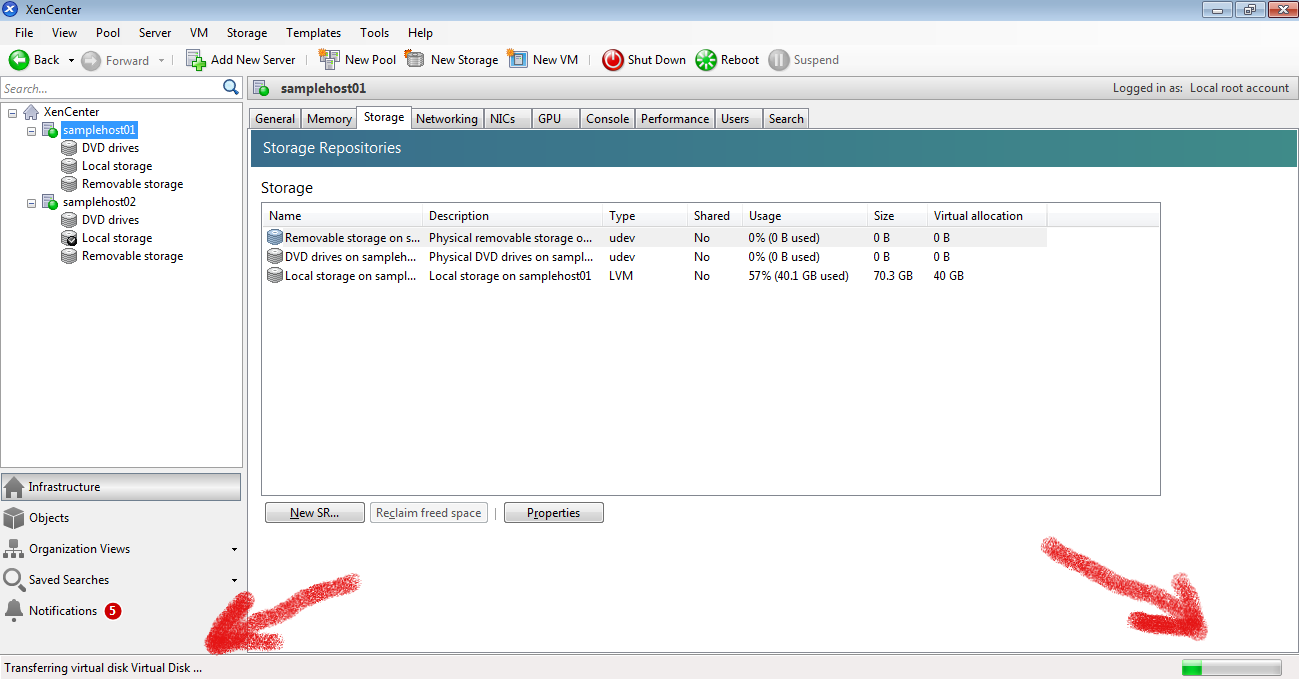
XenCenter: Active operations can be seen on the bottom line by choosing a VM. If anything appears, there is an active process in progress.
Figure 6: XenCenter - XenServer VM active process.
F. Is the hosts' management interfaces bonded?
This is an easy one. Just check if there are bonded interfaces with xe bond-list:
		[root@samplehost01 ~]# xe bond-list
		[root@samplehost01 ~]#
Listing 16: Looking at active bonds with xe bond-list (samplehost01).
		[root@samplehost02 ~]# xe bond-list
		[root@samplehost02 ~]#
Listing 17: Looking at active bonds with xe bond-list (samplehost01).
Nothing in both cases. If something shows up here, it can be removed with xe bond-destroy.
G. Is the management IP address of each host static?
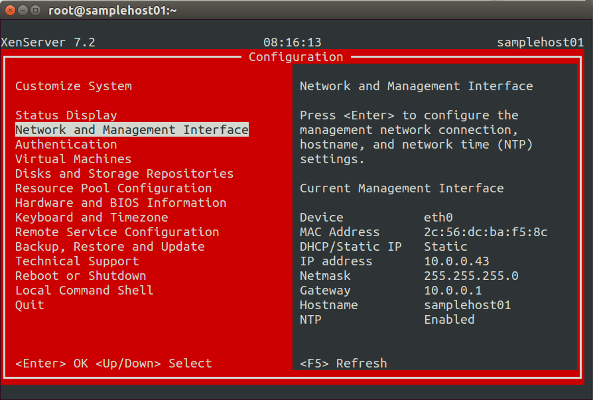
Figure 7: xsconsole - network settings.
The fastest way of checking whether the IP address is static is to use the XenServer CLI from the SSH console. Just type xsconsole and the xsconsole shown in the figure appears. Use the down-arrow to move to Network and Management Interface. We can see that in this case, the IP address is static. The same is the case for samplehost02. Next!
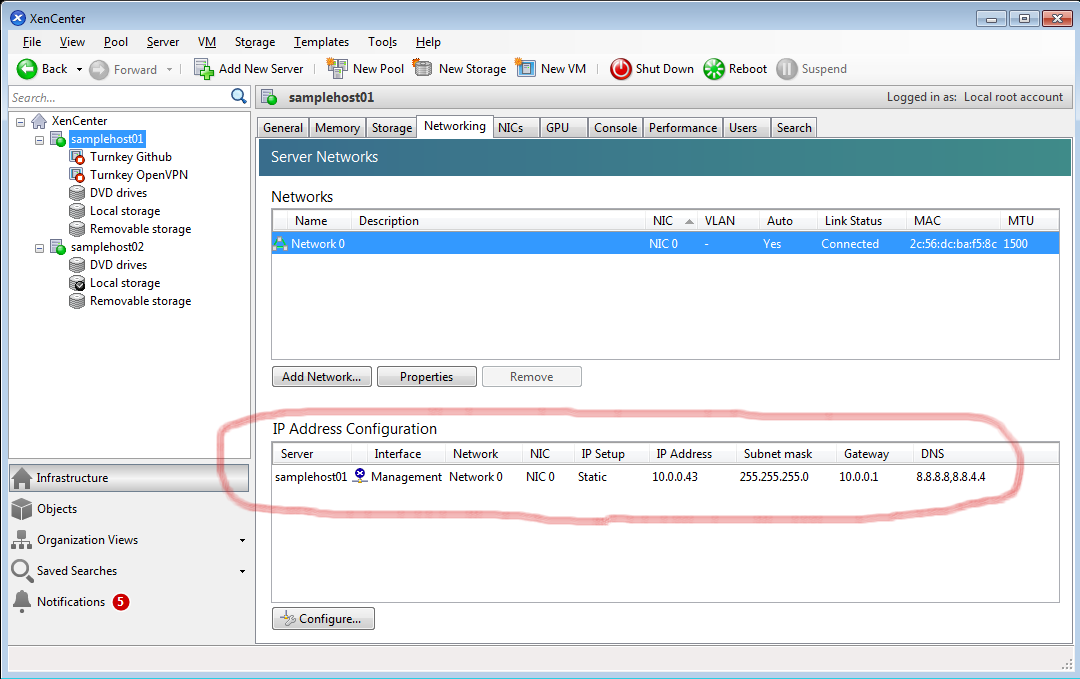
In XenCenter: Click on the networking tab for details. Under IP Setup, we can see that samplehost01 has a static ip setup.
Figure 8: XenCenter - hosts with a static ip setup.
H. Are the hosts running the same version of XenServer software, at the same patch level?
We can get a lot of data on each host by using xe host-param-list, but it needs the host's UUID. Let's get that first:
	[root@samplehost01 ~]# xe host-list
		uuid ( RO)                : 2b92ba08-26a4-43bb-979f-919cab5dad02
		          name-label ( RW): samplehost01
		    name-description ( RW): Default install
Listing 18: Getting the UUID with xe host-list (samplehost01).
Then we use the UUID as a parameter in xe host-param-list:
		[root@samplehost01 ~]# xe host-param-list uuid=2b92ba08-26a4-43bb-979f-919cab5dad02
		uuid ( RO)                                  : 2b92ba08-26a4-43bb-979f-919cab5dad02
		                            name-label ( RW): samplehost01
		                      name-description ( RW): Default install
		                    allowed-operations (SRO): VM.migrate; provision; VM.resume; evacuate; VM.start
		                    current-operations (SRO):
		                               enabled ( RO): true
		                               display ( RO): enabled
		                     API-version-major ( RO): 2
		                     API-version-minor ( RO): 7
		                    API-version-vendor ( RO): XenSource
		     API-version-vendor-implementation (MRO):
		                               logging (MRW):
		                 suspend-image-sr-uuid ( RW): 35f93cb9-0a8f-193d-d762-db4246af3a85
		                    crash-dump-sr-uuid ( RW): 35f93cb9-0a8f-193d-d762-db4246af3a85
		                      software-version (MRO): product_version: 7.2.0; product_version_text: 7.2; product_version_text_short: 7.2; platform_name: XCP; platform_version: 2.3.0; product_brand: XenServer; build_number: release/falcon/master/8; hostname: f7d02093adae; date: 2017-05-11; dbv: 2017.0517; xapi: 1.9; xen: 4.7.2-2.2; linux: 4.4.0+10; xencenter_min: 2.7; xencenter_max: 2.7; network_backend: openvswitch; db_schema: 5.120
		                          capabilities (SRO): xen-3.0-x86_64; xen-3.0-x86_32p; hvm-3.0-x86_32; hvm-3.0-x86_32p; hvm-3.0-x86_64;
		                          other-config (MRW): agent_start_time: 1505906667.; boot_time: 1505906641.; iscsi_iqn: iqn.2017-07.com.example:f30f8e54
		                              cpu_info (MRO): cpu_count: 2; socket_count: 1; vendor: GenuineIntel; speed: 1039.990; modelname: Intel(R) Celeron(R) CPU  N3000  @ 1.04GHz; family: 6; model: 76; stepping: 3; flags: fpu de tsc msr pae mce cx8 apic sep mca cmov pat clflush acpi mmx fxsr sse sse2 ht syscall nx lm constant_tsc arch_perfmon rep_good nopl nonstop_tsc pni pclmulqdq monitor est ssse3 cx16 sse4_1 sse4_2 movbe popcnt aes rdrand hypervisor lahf_lm 3dnowprefetch ida arat epb dtherm erms; features: 43d8e3bf-bfebfbff-00000101-28100800; features_pv: 17c9cbf5-c2f82203-2191cbf5-00000103-00000000-00000200-00000000-00000000-00000000; features_hvm: 17cbfbff-c3f82223-2993fbff-00000103-00000000-00000282-00000000-00000000-00000000
		                          chipset-info (MRO): iommu: false
		                              hostname ( RO): samplehost01
		                               address ( RO): 10.0.0.43
		                 supported-bootloaders (SRO): pygrub; eliloader
		                                 blobs ( RO):
		                       memory-overhead ( RO): 201449472
		                          memory-total ( RO): 4202041344
		                           memory-free ( RO): 3221094400
		                  memory-free-computed ( RO): 3202625536
		                     host-metrics-live ( RO): true
						  patches (SRO) [DEPRECATED]: 5e70fd1b-0000-0000-a369-ea2e31f47f70, dc58f098-0000-0000-8a7c-4ec976b4aeef, e93bcdd9-0000-0000-af60-9d4c79d44939, 7687d153-0000-0000-81bb-0865e546c84b
	                               	   updates (SRO): 7687d153-2a4c-43de-81bb-0865e546c84b, e93bcdd9-412d-4cf9-af60-9d4c79d44939, dc58f098-68e6-4c87-8a7c-4ec976b4aeef, 5e70fd1b-42c6-488b-a369-ea2e31f47f70
		                         ha-statefiles ( RO):
		                      ha-network-peers ( RO):
		                    external-auth-type ( RO):
		            external-auth-service-name ( RO):
		           external-auth-configuration (MRO):
		                               edition ( RO): free
		                        license-server (MRO): address: localhost; port: 27000
		                         power-on-mode ( RO):
		                       power-on-config (MRO):
		                        local-cache-sr ( RO):
		                                  tags (SRW):
		                            ssl-legacy ( RW): true
		                    guest_VCPUs_params (MRW):
		    virtual-hardware-platform-versions (SRO): 0; 1; 2
		                   control-domain-uuid ( RO): b6f69169-ca93-4596-9c1b-cc0191da98f4
		                          resident-vms (SRO): b6f69169-ca93-4596-9c1b-cc0191da98f4
		              updates-requiring-reboot (SRO):
		                              features (SRO):
Listing 19: Getting complete information of a host with xe host-param-list with a given UUID (samplehost01).
That's a lot of information in one place. However, we are just looking for the XenServer version and the patch level. That information is available under software-version (MRO) and updates:
software-version (MRO): product_version: 7.2.0; product_version_text: 7.2; product_version_text_short: 7.2; platform_name: XCP; platform_version: 2.3.0; product_brand: XenServer; build_number: release/falcon/master/8; hostname: f7d02093adae; date: 2017-05-11; dbv: 2017.0517; xapi: 1.9; xen: 4.7.2-2.2; linux: 4.4.0+10; xencenter_min: 2.7; xencenter_max: 2.7; network_backend: openvswitch; db_schema: 5.120
Listing 20: XenServer software-version (samplehost01).
updates (SRO): 7687d153-2a4c-43de-81bb-0865e546c84b, e93bcdd9-412d-4cf9-af60-9d4c79d44939, dc58f098-68e6-4c87-8a7c-4ec976b4aeef, 5e70fd1b-42c6-488b-a369-ea2e31f47f70
Listing 21: XenServer patches (samplehost01).
So what does the samplehost2 information look like? Using the same command in the samplehost2 CLI, we get:
software-version (MRO): product_version: 7.2.0; product_version_text: 7.2; product_version_text_short: 7.2; platform_name: XCP; platform_version: 2.3.0; product_brand: XenServer; build_number: release/falcon/master/8; hostname: f7d02093adae; date: 2017-05-11; dbv: 2017.0517; xapi: 1.9; xen: 4.7.2-2.2; linux: 4.4.0+10; xencenter_min: 2.7; xencenter_max: 2.7; network_backend: openvswitch; db_schema: 5.120
Listing 22: XenServer software-version (samplehost02).
updates (SRO): 7687d153-2a4c-43de-81bb-0865e546c84b, e93bcdd9-412d-4cf9-af60-9d4c79d44939, dc58f098-68e6-4c87-8a7c-4ec976b4aeef, 5e70fd1b-42c6-488b-a369-ea2e31f47f70
Listing 23: XenServer patches (samplehost02).
They are identical. Next!
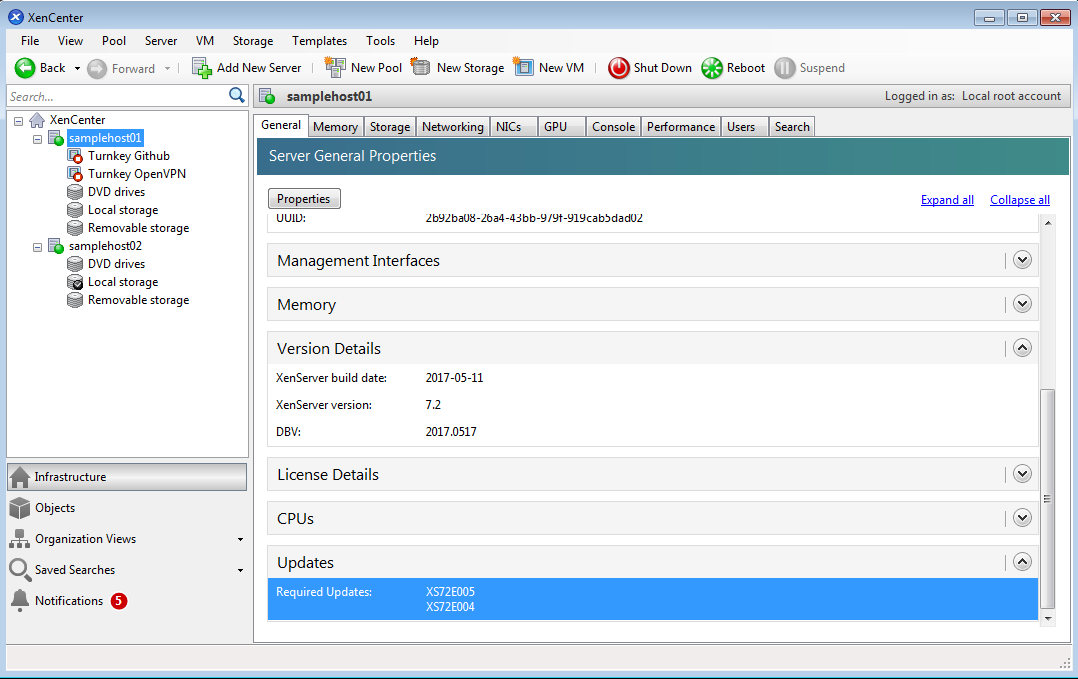
XenCenter: The version and patch level can be checked under the General-tab:
Figure 9: XenCenter - patch level and version.
I. Are the clocks of the hosts synchronized to the same time?

Figure 10: xsconsole - network settings.
The fastest way of checking whether the time is synchronized on the hosts is to use the XenServer CLI from the SSH console and check whether NTP has been enabled. Just type xsconsole and the xsconsole shown in the figure appears. Use the down-arrow to move to Network and Management Interface. We can see that in this case, NTP has been activated. The same is the case for samplehost02. Moreover, we can simply check the time by looking at the top of the xsconsole. Both xsconsoles show the same time.
Alternatively, we could check that the hosts actually have the same time and time-zone - and that NTP is running - via the CLI:
		[root@samplehost01 ~]# date
		vie sep 22 08:32:04 CEST 2017

		[root@samplehost01 ~]# ntpstat
		synchronised to NTP server (213.251.52.234) at stratum 3
		   time correct to within 128 ms
		   polling server every 1024 s
Listing 24: Checking the clock and the NTP with date and ntpstat, respectively (samplehost01).
		[root@samplehost02 ~]# date
		vie sep 22 08:32:10 CEST 2017

		[root@samplehost02 ~]# ntpstat
		synchronised to NTP server (213.251.52.234) at stratum 3
		   time correct to within 128 ms
		   polling server every 1024 s
Listing 25: Checking the clock and the NTP with date and ntpstat, respectively (samplehost02).
The NTP is active and the clocks on both hosts are the same (it takes a few fractions of a second to type date in the subsequent CLI, hence the small difference). We have reached the end of the requirements and are ready to deploy.
Step 2 - Creating the Initial Pool
A minimum of 2 hosts is needed for manual fail-over. Up to 16 hosts are supported per resource pool.
We get going by gathering some basic information; hostname, host UUID, and the UUID of the initial pool on the host.
		[root@samplehost01 ~]# hostname
		samplehost01

	[root@samplehost01 ~]# xe host-list
		uuid ( RO)                : 2b92ba08-26a4-43bb-979f-919cab5dad02
		          name-label ( RW): samplehost01
		    name-description ( RW): Default install

		[root@samplehost01 ~]# xe pool-list
		uuid ( RO)                : b3012c9d-1f16-1cf0-e5c0-d32781b0635b
		          name-label ( RW):
		    name-description ( RW):
		              master ( RO): 2b92ba08-26a4-43bb-979f-919cab5dad02
		          default-SR ( RW):
Listing 26: Getting basic host information with hostname and xe pool-list (samplehost01).
As we saw in Step 1 - B, the host is not part of any pool if the name-label of the initial pool is empty:
	[root@samplehost01 ~]# xe pool-param-list uuid=b3012c9d-1f16-1cf0-e5c0-d32781b0635b
		uuid ( RO)                            : b3012c9d-1f16-1cf0-e5c0-d32781b0635b
		                      name-label ( RW):
		                name-description ( RW):
		                          master ( RO): 2b92ba08-26a4-43bb-979f-919cab5dad02
		                      default-SR ( RW):
		                   crash-dump-SR ( RW):
		                suspend-image-SR ( RW):
		              supported-sr-types ( RO): smb; lvm; iso; nfs; hba; lvmofcoe; udev; dummy; lvmoiscsi; lvmohba; ext; file; iscsi
		                    other-config (MRW): memory-ratio-hvm: 0.25; memory-ratio-pv: 0.25
		              allowed-operations (SRO): ha_enable
		              .....
Listing 27: Checking pool name-label and name-description with xe pool-param-list (samplehost02).
We can go ahead and create a pool with the host samplehost01 as the poolmaster simply by giving the initial pool a name-label:
[root@samplehost01 ~]# xe pool-param-set name-label=samplepool name-description="A XenServer sample pool" uuid=b3012c9d-1f16-1cf0-e5c0-d32781b0635b
Listing 28: Creating a pool by setting the name-label with xe pool-param-set (samplehost01).
Let's just make sure that it worked:
		[root@samplehost01 ~]# xe pool-param-list uuid=b3012c9d-1f16-1cf0-e5c0-d32781b0635b
		uuid ( RO)                            : b3012c9d-1f16-1cf0-e5c0-d32781b0635b
		                      name-label ( RW): samplepool
		                name-description ( RW): A XenServer sample pool
		                          master ( RO): 2b92ba08-26a4-43bb-979f-919cab5dad02
		                      default-SR ( RW):
		                   crash-dump-SR ( RW):
		                suspend-image-SR ( RW):
						......
Listing 29: Checking the pool name-label with xe pool-param-set (samplehost01).
It did. We can now go ahead and add the other host - samplehost02 - to the pool:
	[root@samplehost02 ~]# xe pool-join master-address=samplehost01 master-username=***USER*** master-password=***PASSWORD***
	Host agent will restart and attempt to join pool in 10.000 seconds...
	[root@samplehost02 ~]# xe host-list
		uuid ( RO)                : c6f064db-b021-44dc-8769-32d0d881ec92
		          name-label ( RW): samplehost02
		    name-description ( RW): Default install


		uuid ( RO)                : 2b92ba08-26a4-43bb-979f-919cab5dad02
		          name-label ( RW): samplehost01
		    name-description ( RW): Default install
Listing 30: Adding a host to a pool with xe pool-join (samplehost02), and confirming with xe host-list.
That worked. There are now two hosts visible from each host.
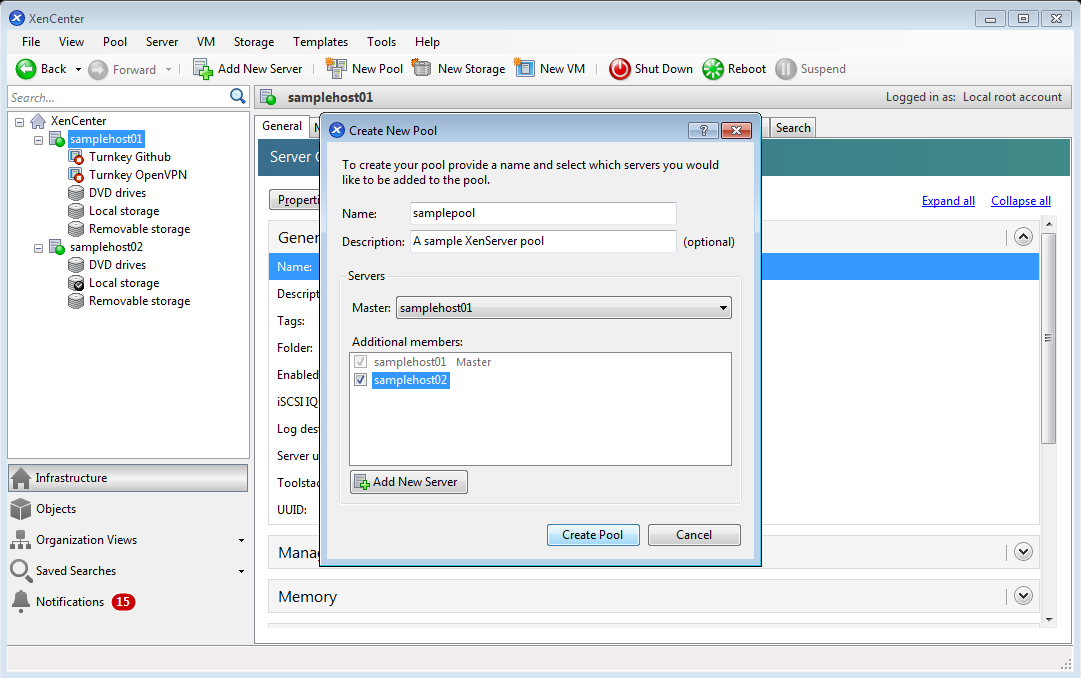
Figure 11: XenCenter - create pool.
Step 3 - Add a Storage Repository
In this example, we will be using an NFS share. Create an NFS file share on a bare-metal Linux server, see [7] for details. Then, create an NFS VDH Storage on the NFS share as set out in [2] and [3], page 22. In brief, adding NFS shared storage to a resource pool using the CLI is done as follows:
- Open a CLI on any XenServer host in the pool.
- Create the storage repository on by issuing the command:
$ xe sr-create content-type=user type=nfs name-label=<"Example SR"> shared=true device-config:server= device-config:serverpath= - Find the UUID of the pool by the command
$ xe pool-list - Set the shared storage as the pool-wide default with the command
xe pool-param-set uuid= default-SR=
Our NFS-share is on 10.0.0.63 with the path /opt/share:
		[root@samplehost01 ~]# xe sr-create content-type=user type=nfs name-label="sampleSR" shared=true device-config:server=10.0.0.63 device-config:serverpath=/opt/share
		e24083ed-778c-2800-c837-5611ac9767d5
		[root@samplehost01 ~]# xe pool-list
		uuid ( RO)                : b3012c9d-1f16-1cf0-e5c0-d32781b0635b
		          name-label ( RW): samplepool
		    name-description ( RW): A XenServer sample pool
		              master ( RO): 2b92ba08-26a4-43bb-979f-919cab5dad02
		          default-SR ( RW):

		[root@samplehost01 ~]# xe pool-param-set uuid=b3012c9d-1f16-1cf0-e5c0-d32781b0635b default-SR=e24083ed-778c-2800-c837-5611ac9767d5
Listing 31: Creating a storage repository for a pool by setting the default-SR with xe pool-param-set (samplehost01).
Check that the command was successful:
		[root@samplehost01 ~]# xe sr-list
		uuid ( RO)                : a1948f97-74c6-5853-636d-011ed328701d
		          name-label ( RW): DVD drives
		    name-description ( RW): Physical DVD drives
		                host ( RO): samplehost01
		                type ( RO): udev
		        content-type ( RO): iso

		uuid ( RO)                : e24083ed-778c-2800-c837-5611ac9767d5
		          name-label ( RW): sampleSR
		    name-description ( RW):
		                host ( RO):
		                type ( RO): nfs
		        content-type ( RO): user


		uuid ( RO)                : eebf776b-25a4-95e6-8f09-6c3d4617db63
		          name-label ( RW): Removable storage
		    name-description ( RW):
		                host ( RO): samplehost01
		                type ( RO): udev
		        content-type ( RO): disk


		uuid ( RO)                : 1fe2de86-33cc-d171-958e-3e6091ca05e5
		          name-label ( RW): Local storage
		    name-description ( RW):
		                host ( RO): samplehost02
		                type ( RO): lvm
		        content-type ( RO): user


		uuid ( RO)                : 35f93cb9-0a8f-193d-d762-db4246af3a85
		          name-label ( RW): Local storage
		    name-description ( RW):
		                host ( RO): samplehost01
		                type ( RO): lvm
		        content-type ( RO): user


		uuid ( RO)                : 373c6177-2bfb-d75c-c774-2664a971000f
		          name-label ( RW): Removable storage
		    name-description ( RW):
		                host ( RO): samplehost02
		                type ( RO): udev
		        content-type ( RO): disk


		uuid ( RO)                : adf2e119-6cd7-1b4e-f192-4492043420b9
		          name-label ( RW): DVD drives
		    name-description ( RW): Physical DVD drives
		                host ( RO): samplehost02
		                type ( RO): udev
		        content-type ( RO): iso


		uuid ( RO)                : 90099b2e-3112-15da-77bc-89b16631d531
		          name-label ( RW): XenServer Tools
		    name-description ( RW): XenServer Tools ISOs
		                host ( RO):
		                type ( RO): iso
	    	    content-type ( RO): iso
Listing 32: Checking available storage repositories with xe sr-list (samplehost01).
The sampleSR is visible and shared. Since the shared storage is set as the pool-wide default, all future VMs will have their disks created on shared storage by default. See [3], Chapter 5, Storage, for information about creating other types of shared storage.
The device-config:server refers to the hostname of the NFS server and device-config:serverpath refers to the path on the NFS server. Since shared is set to true, the shared storage will be automatically connected to every XenServer host in the pool, and any XenServer hosts that subsequently join will also be connected to the storage. The Universally Unique Identifier (UUID) of the created storage repository will be printed on the screen.
XenCenter: You add an SR simply by right-clicking the pool, choosing New SR, and then just following the dialog.
Step 4 - Adding Hosts to the Pool
You add a host to the pool by using the xe pool-join-command. Only servers that are not a part of another pool - and that comply with all the other prerequisites above - can be added. Before adding the host to a pool, the world looks like this seen from the host to be added:
		[root@samplehost02 ~]# xe host-list
		uuid ( RO)                : c6f064db-b021-44dc-8769-32d0d881ec92
		          name-label ( RW): samplehost02
		    name-description ( RW): Default install

		[root@samplehost02 ~]# xe pool-list
		uuid ( RO)                : efe486bf-3a26-782e-a5c0-b3ceaf1cfffe
		          name-label ( RW):
		    name-description ( RW):
		              master ( RO): c6f064db-b021-44dc-8769-32d0d881ec92
		          default-SR ( RW): 07d0a22a-6ded-78ea-9497-337056441ec1
Listing 33: Checking that a host is not already a member of a pool with xe host-list and xe pool-list (samplehost02).
Only the host we are on is visible, and only the non-active, nameless pool that is part of any XenServer host is shown. Now let's add this host to a pool and see what happens:
		[root@samplehost02 ~]# xe pool-join master-address=10.0.0.43 master-username=***USER*** master-password=***PASSWORD***
		Host agent will restart and attempt to join pool in 10.000 seconds...
		[root@samplehost02 ~]# xe pool-list
		uuid ( RO)                : b3012c9d-1f16-1cf0-e5c0-d32781b0635b
		          name-label ( RW): samplepool
		    name-description ( RW): A XenServer sample pool
		              master ( RO): 2b92ba08-26a4-43bb-979f-919cab5dad02
		          default-SR ( RW): e24083ed-778c-2800-c837-5611ac9767d5
Listing 34: Adding a host to a pool with xe pool-join (samplehost02).
Let's give it a few seconds. 10 o be precise. After that, list pools and hosts:
		[root@samplehost02 ~]# xe pool-list
		uuid ( RO)                : b3012c9d-1f16-1cf0-e5c0-d32781b0635b
		          name-label ( RW): samplepool
		    name-description ( RW): A XenServer sample pool
		              master ( RO): 2b92ba08-26a4-43bb-979f-919cab5dad02
		          default-SR ( RW): e24083ed-778c-2800-c837-5611ac9767d5


		[root@samplehost02 ~]# xe host-list
		uuid ( RO)                : c6f064db-b021-44dc-8769-32d0d881ec92
		          name-label ( RW): samplehost02
		    name-description ( RW): Default install


		uuid ( RO)                : 2b92ba08-26a4-43bb-979f-919cab5dad02
		          name-label ( RW): samplehost01
		    name-description ( RW): Default install
Listing 35: Checking with xe host-list and xe pool-list that a host has become a member of a pool (samplehost02).
We are good. The pool that is visible now is the one we have joined. The empty, non-active pool isn't listed anymore. Moreover, both samplehost01 and samplehost02 are now visible in the host-list.
If you added a host by mistake, you can eject that host:
			[root@samplehost02 ~]# xe host-list
			uuid ( RO)                : c6f064db-b021-44dc-8769-32d0d881ec92
			          name-label ( RW): samplehost02
			    name-description ( RW): Default install


			uuid ( RO)                : 2b92ba08-26a4-43bb-979f-919cab5dad02
			          name-label ( RW): samplehost01
			    name-description ( RW): Default install

			[root@samplehost02 ~]# xe pool-eject host-uuid=c6f064db-b021-44dc-8769-32d0d881ec92
			WARNING: Ejecting a host from the pool will reinitialise that host's local SRs.
			WARNING: Any data contained with the local SRs will be lost.
			Type 'yes' to continue
			yes
			Specified host will attempt to restart as a master of a new pool in 10.000 seconds...
			[root@samplehost02 ~]# Connection to 10.0.0.53 closed by remote host.
			Connection to 10.0.0.53 closed.
Listing 36: Removing a member of a pool with xe xe pool-eject (samplehost02).
The part about attempting to restart as a master of a new pool just means that the host will restart as a master of a nameless pool, that is, the default non-active pool that is a part of all XenServer hosts.
Step 5 - System Restart and Check
To restart the pool, for each host in the pool do the following:
		xe host-disable host=
		xe host-evacuate uuid=
		xe host-reboot host=
Listing 37: Restarting hosts in a pool with xe host-disable, xe host-evacuate and xe host-reboot.
Check: List the pool and hosts on each host. The pool and the hosts should be visible as before the restart.
XenCenter check: Right-click on the XenServer instances and click reboot.
Conclusion
What you have seen is pretty much what is required to set up a pool; installation of XenServer on two hosts, and a shared storage repository. The next step is to install and use VMs. That will be the next article in this blog.
Note: We have not discussed the nitty-gritty of network setup for XenServer pools. That will be the theme of a separate article. The setup above will get you going, but it is prone to network congestion.
Wishes? Opinions? Feedback as such? Please get in touch. If you want a particular theme discussed, let us know. The same goes if you want to see this article in another language. Thanks.
Troubleshooting
Stopping Unwanted Processes
The problem with a pool with shared storage is that some unwanted processes may be kept alive. For instance, if you start a VM export and then lose connectivity to the export storage, the process may hang. The steps to remedy the situation are as follows:
1. Find the UUID of the hung VM: # xe vm-list
2. Find the Domain ID of the hung VM.# list_domains
3. Match the UUID with the ID number:
	id |                                 uuid |  state
	0  | 2fe455fe-3185-4abc-bff6-a3e9a04680b0 |    R
	47 | 267227f3-a59e-dafe-b183-82210cf51ec4 |    B
	59 | 298817fb-8a3e-7501-11e0-045a8aa860ff |    B
	60 | 46e3d5aa-2f02-dfdc-b053-9a8ac56ec5d1 |    B
	61 | 16cf3204-eb17-5a12-e8d0-c72087bda690 |    B
	62 | 1f9053b5-c6ca-40bb-504e-3017c37e7281 |    H
	63 | ddaec491-097a-e271-362b-f2f985e26e4a |    R
	65 | 55f3b225-4f65-d1ea-aa19-add44c5acce7 |    B
	66 | 7adef6fd-9171-5426-b333-6fb1b57b8e60 |    B H
	67 | 6046dc13-f70b-8398-56fb-069c22440a7c |    B
	68 | f201cd94-a501-00c2-d21e-8c2f03ea167b |    B H
Listing 38: Overview of domains and their status with list_domains.
4. Run destroy_domain on the Domain ID: # /opt/xensource/debug/destroy_domain -domid 62
5. The VM will still show itself as running, so now, we need to reboot it: # xe vm-reboot name-label='name of the VM' –force
The VM is now rebooted and you can start it again.
The Host Name Is Not Resolved When Attempting to Join a Pool
		[root@samplehost02 ~]# xe pool-join master-address=samplehost01 master-username=***USER*** master-password=***PASSWORD***
		The server failed to handle your request, due to an internal error.  The given message may give details useful for debugging the problem.
		message: Connection failed: no host resolved.
Listing 39: Restarting hosts in a pool with xe host-disable, xe host-evacuate and xe host-reboot.
A quick-fix for this problem is to use the IP address instead of the hostname. In addition, you should have a look at your nameserver setup and check that hostnames really resolve on all hosts.
Changelog
2017-10-02: Added the xentop-command to Step 1 - E.
2017-10-02: Added Listings-table and Figures-table.
Figures
Figure 1: XenServer hosts in XenCenter.
Figure 2: XenCenter - host being a member of a pool.
Figure 3: XenCenter - storage overview.
Figure 4: XenCenter - Expanded hosts with VMs visible.
Figure 5: xentop on XenServer host.
Figure 6: XenCenter - XenServer VM active process.
Figure 7: xsconsole - network settings.
Figure 8: XenCenter - hosts with a static ip setup.
Figure 9: XenCenter - patch level and version.
Figure 10: xsconsole - network settings.
Figure 11: XenCenter - create pool.
Listings
Listing 1: Logging into XenServer CLI (Command Line Interface) with SSH (samplehost01).
Listing 2: Logging into XenServer CLI (Command Line Interface) with SSH (samplehost01).
Listing 3: Getting host CPU information with xe host-cu-info (samplehost01).
Listing 4: Getting host CPU information with xe host-cu-info (samplehost02).
Listing 5: Information on networking, available memory and storage (samplehost01).
Listing 6: Pool membership check with xe pool-list (samplehost01).
Listing 7: Pool membership check with xe pool-list (samplehost02).
Listing 8: Getting UUID with xe host-list (samplehost01).
Listing 9: Getting UUID with xe host-list (samplehost02).
Listing 10: Looking at storage repositories with xe sr-list (samplehost01).
Listing 11: Looking at storage repositories with xe sr-list (samplehost02).
Listing 12: Looking at virtual machines with xe vm-list (samplehost01).
Listing 13: Looking at virtual machines with xe vm-list (samplehost02).
Listing 14: Active domains and their state with list_domains (samplehost01).
Listing 15: Active domains and their state with list_domains (samplehost01).
Listing 16: Looking at active bonds with xe bond-list (samplehost01).
Listing 17: Looking at active bonds with xe bond-list (samplehost01).
Listing 18: Getting the UUID with xe host-list (samplehost01).
Listing 20: XenServer software-version (samplehost01).
Listing 21: XenServer patches (samplehost01).
Listing 22: XenServer software-version (samplehost02).
Listing 23: XenServer patches (samplehost02).
Listing 24: Checking the clock and the NTP with date and ntpstat, respectively (samplehost01).
Listing 25: Checking the clock and the NTP with date and ntpstat, respectively (samplehost02).
Listing 26: Getting basic host information with hostname and xe pool-list (samplehost01).
Listing 27: Checking pool name-label and name-description with xe pool-param-list (samplehost02).
Listing 28: Creating a pool by setting the name-label with xe pool-param-set (samplehost01).
Listing 29: Checking the pool name-label with xe pool-param-set (samplehost01).
Listing 32: Checking available storage repositories with xe sr-list (samplehost01).
Listing 34: Adding a host to a pool with xe pool-join (samplehost02).
Listing 36: Removing a member of a pool with xe xe pool-eject (samplehost02).
Listing 37: Restarting hosts in a pool with xe host-disable, xe host-evacuate and xe host-reboot.
Listing 38: Overview of domains and their status with list_domains.
Listing 39: Restarting hosts in a pool with xe host-disable, xe host-evacuate and xe host-reboot.
References
[1] XenServer Storage Repositories – Brief Introduction - https://docs.citrix.com/en-us/xencenter/6-2/xs-xc-storage/xs-xc-storage-about.html
[2] NFS VDH Storage - http://docs.citrix.com/en-us/xencenter/6-2/xs-xc-storage/xs-xc-storage-pools-add/xs-xc-storage-pools-add-nfsvhd.html
[3] XenServer 7.1 Administration Guide - http://docs.citrix.com/content/dam/docs/en-us/xenserver/7-1/downloads/xenserver-7-1-administrators-guide.pdf
[4] How to Install a Two-Server XenServer Solution - https://www.youtube.com/watch?v=kw_WHSnjbR0
[5] Initial Server Setup with Ubuntu 16.04 - https://www.digitalocean.com/community/tutorials/initial-server-setup-with-ubuntu-16-04
[6] Ubuntu UFW Firewall:
- Intro: https://help.ubuntu.com/lts/serverguide/firewall.html
- Detailed: https://www.lullabot.com/articles/the-uncomplicated-firewall
[7] How to Set Up NFS File Shares - https://www.digitalocean.com/community/tutorials/
About Me
Experienced dev and PM. Data science, DataOps, Python and R. DevOps, Linux, clean code and agile. 15+ years working remotely. Polyglot. Startup experience.
Signal: ElToro.1966

